Pages

Showing posts with label baking. Show all posts

Monday, May 28, 2012

Homemade Graham Crackers Recipe

As you may know from reading my bread-making post, I am trying to make more homemade stuff. I have a growing list of things I want to make, but most recently I tackled graham crackers. I looked through two recipes and used a bit from both. From Smitten Kitchen I took the topping for the graham crackers and from Chocolate & Carrots I took most of the recipe. I did use regular flour and sugar though. I figure I will just rewrite the recipe as I did it. So please consider it an adaptation from the two blogs.

Homemade Graham Crackers 
Ingredients
Crackers
2 1/2 cup flour
1/2 teaspoon baking soda
1/2 teaspoon ground cinnamon
1 cup (2 sticks) unsalted butter, mostly melted
1/4 cup packed dark brown sugar
1/4 cup sugar
1/4 cup honey
 Topping
3 tablespoons sugar
1 teaspoon ground cinnamon
Make the Dough
In a bowl stir the flour, baking soda, and cinnamon together. Set aside.
In another bowl mix the remaining ingredients together. Your butter should be mostly melted, but not fully. You can hand mix or use a mixer to beat the ingredients until combined.*
Add in the flour mixture in two shifts, mixing until well combined.

Chill the Dough
Try to make your dough look rectangular, wrap it in plastic wrap and put it in the fridge to harden. (the rectangle isn't that important, it just may help with cutting the dough later)
Wait 30 minutes or longer, until dough is chilled and firm.

Cut Out the Crackers
Preheat the oven to 350°F.
Roll out the dough on a floured surface until it’s 1/8 thick. The dough will be sticky so use more flour as necessary and roll out the dough slowly to prevent tearing.
Cut the dough out into  squares of whatever size your prefer with whichever tool you prefer (I used a pizza cutter).

Bake the Crackers 
Preheat the oven to 350°F.
Place the crackers, about 1 inch apart, on a baking sheet covered with parchment paper.
Score the squares down the middle and poke some holes in the top with a fork, or decorate however you prefer.
Sprinkle the topping over the crackers.
Place the baking sheet in the freezer for 5-10 minutes to harden the cookies a little before baking.
Bake for 15-20 minutes, rotating the pan halfway through.
Allow to cool before removing from the baking sheet(s).


Enjoy!
S'mores, cheesecake, an afternoon snack...whatever you want to use these crackers for go for it! They are certifiably delicious! Though don't expect them to taste like store-bought ones (aka junk). These are a little more like cinnamon shortbread cookies. They'd be great with tea and maybe jam!

If you do make these let me know how they turn out and what you have with them!
Stay Lovely,
Katelin 

Sunday, May 13, 2012

Bread Making - An Attempt and Partial Success

I'm so tired of all the extra, unnecessary ingredients in store-bought food. A simple loaf of bread has a magnitude of "fake" ingredients including such bizarre things asazodicarbonamide (found, in the UK, to be a respiratory sensitizer and can increase the risk of allergic reactions to other ingredients in the food such as dyes) , calcium propionate (a preservative, which is slightly toxic and, strangely, can be and is used to give rats a model of human autism), and, of course, high fructose corn syrup. It's too much. And bread isn't even the tip of the iceberg when it comes to random crap in our food, but it is a good starting point. 

For years I've been planning to start making my own food and/or buying fresh made local food. Putting for the effort it takes is so worth the reward I think. Now that I've moved into my apartment I can finally get started on my plan! And so I have. First stop: bread.
Recipe and tools all ready to go
I used this recipe from Get Up Off Your Butt And Bake (a fantastic blog you should all check out). I got all ready and set off for my first attempt at bread, hoping for the best and wearing my cutest apron for confidence.
 
It took no time at all to start twirling my little kitchen into an absolute mess. And it was only going to get worse.
Check out that yeast! Look at it rise! That started at about 2/3 cups! Beautiful!
I just got my dough hooks in the mail Friday. But as soon as I started mixing I feared my little hand mixer wasn't up to the task of this recipe. My bowl was a little small for recipe as well. The recipe, halved, makes two loaves of bread and 20 scones (or three loaves of bread but I wanted to try out the scones - bad choice as you will see later). Well, the dough didn't cooperate with my mixer, that's for sure. At one point my little dough hook fell out, unable to support the weight of the dough climbing up on it. The dough also took victim my spatula, pulling the spatula off of the handle.
Finally I just sighed, put down the mixer, and went to work the good old-fashioned way: kneading by hand. I would have done that anyway but was worried I would over-knead it.

I didn't have a bowl big enough to let the dough rise in, so I went ahead an pulled out my great big sauce pan. It worked pretty darn well too!
Look at that! Beautiful!


I tried to shape mine nicely like she does on her site, but it didn't go so well. I may have also abused the left one too much trying to get it to look "right."
One of my loaves rose faster than the other, so I baked them separate. The one that didn't raise at the right speed was the one I fear I handled too much trying to shape it. During this I attempted scones...I won't go into the details but they died a painful death. Afterwards my mom (happy mothers day mom!) informed me I should have never attempted to cook them in oil like she said to. Lesson learned.

My first loaf looked great, despite a piece of crust falling off when I turned it onto the rack. My second loaf...struggled. It sort of deflated in the oven. Not sure why. If you happen to know, please share!
Though my bread doesn't quite look perfect, it tastes great! Thankfully! And I hear it only get's easier. It will be easier too once I understand my oven a little better. I think it may bake a little quicker than most recipes call for, but haven't made enough to yet be sure.
So I have my first bread! I'm looking forward to taking a peanut butter and jelly sandwich to work tomorrow with my fresh bread, homemade jam from the farmers market, and peanut butter (still not homemade but I'm taking small steps).

Stay Lovely,
Katelin

Monday, May 7, 2012

My First Meal: Chicken Stir-Fry and Crescent Rolls

It's a day of firsts for me. I worked for the first day of my full-time job, and came home to make my first real meal tonight in my first apartment! Now that I have a kitchen (after three years in the dorms) I intend to make delicious REAL meals all the time. Yes, real! As in not questionable like the fare at the dorm dining center always was.

So what did I pick for my first meal attempt? A yummy looking chicken stir-fry and crescent rolls from scratch! Both recipes I used came from the fantastic food blog Get Off Your Butt and Bake.

Crescent Rolls
That's right, homemade crescent rolls for my first real meal! With yeast, rising and everything! It was actually a lot easier to make than I thought. Though I will say I thought they tasted at least a little bland, but I think that may have had something to do with lack of extreme amounts of butter. I didn't have anything to brush butter on my dough and finished rolls with, so those few steps were a little difficult. But still, hard to go wrong with fresh from the oven rolls.


Stir-Fry
This was the first time I had ever cut chicken, and let me tell you it is not a piece of cake. Plus I was extra worried about that whole cleaning up properly because of salmonella. I also cut up carrots and the frozen broccoli I got. I even managed to steam both the carrots and broccoli together instead of attempting to do them separate AND they weren't even remotely over-cooked!


I will admit, making this meal took what seemed like an awfully long time. But I'm sure things will speed up the more I cook. Regardless I had a lovely meal and even had lovely company as my friend Alyssa stopped in to see my new place and shared this lovely dinner with me! 


You should absolutely check out Get Off Your Butt and Bake for fantastic and simple recipes! I'm certain I will be making many more, including loafs of bread and a beef stir fry!

Stay Lovely,
Katelin

Thursday, February 2, 2012

Apple Pie!

Tomorrow is Thanksgiving, which means preparing delicious food! In my family desserts are made more than anything else, so today I made an apple pie with my mom! She was gracious enough to both teach me how to make it and help me photograph the process, which meant it took a little longer to make.

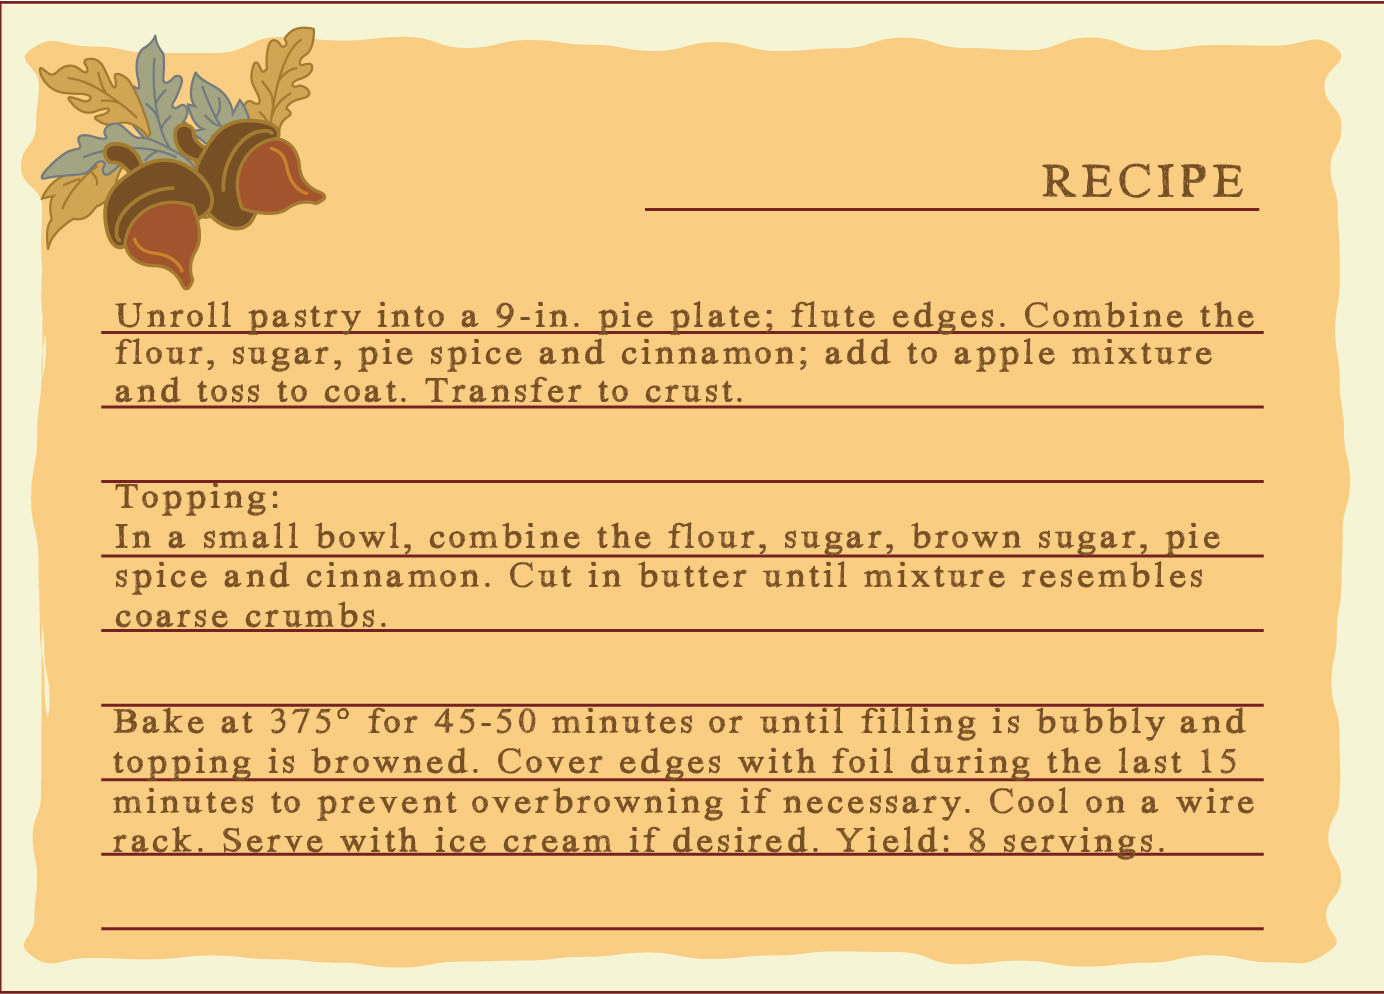
We used a recipe from Taste of Home called Delightful Apple Pie. My mom made a few adjustments however, including eliminated the walnuts and apple butter, adding oats and caramel topping, and changing the amount of butter used. Here is our revised recipe:
  
click on the recipe cards to see them bigger and print!

And here are some pics of the process:

And The Final Delightful Apple Pie! I think tomorrow I will have to  eat my dessert first!


Stay Lovely,
Katelin