Pages

Showing posts with label diy. Show all posts

Tuesday, July 31, 2012

Super Cleaning Powers


Yes. That is correct. I have recently developed SUPER cleaning powers. And it's thanks to this amazing thing called baking soda and Ceara from DIYConfessions. I will most likely be eternally grateful to both! 

Story time:I moved into my first apartment ever a few months ago. This wasn't a brand new apartment, so it had of course housed a few other people. Mostly though, it's really clean. But I'm a tad OCD and there was one area that was not clean enough for me: The Kitchen Sink. 

Yes, it was a little grimy and filled with black scratch marks and waters stains all over. It was driving me nutty.. I didn't get a before picture, sadly, but I'm sure you can imagine, especially if you've ever rented an apartment or house. 

I went on a hunt for a cleaning solution, and I found a recipe from DIYConfessions for a natural water stain remover. Now, I didn't have a great big spray bottle to mix the ingredients in like she did, so I justput in varying amounts of the three ingredients in a little dollar spray bottle: 
  1. White Vinegar
  2. Lemon Juice
  3. Dish Soap
This mix works pretty well alone, but if you want to see some real magic (which, who doesn't want to see cleaning related magic?) Follow these steps:
  1. Mix spray
  2. Sprinkle baking soda over trouble zones
  3. Spray with the stain remover mix
  4. Let bubble up in cleaning goodness
  5. Scrub away the grime!
And you're done! For less troubling areas that just need a little bit of TLC, you can just let the baking soda sprayed with the mix sit for a few minutes and then rinse away.

Enjoy your new super cleaning powers! You'll feel the need to wear a cape while cleaning now, trust me.

Monday, April 16, 2012

I'm Back! Crochet Blanket, Amigurumi and more

Hello All! I had to put a pause on Hello Lovely for a little while and focus on another blog I have (The Gallery) for a class of mine. I've been busy though!

I finished my first granny stripe afghan! This will be the second blanket I have crocheted, the first being a Christmas present for my mom (below). That was a monster. Nothing compared to the one I made for myself, it was made with Lion Brand's Wool Ease which makes it rather heavy. It's perfect for those chilly winter nights in Iowa, that's for sure.

After snuggling in that one I knew I had to make one for myself. I had started a granny square blanket a while back, but that just wasn't for me. You change colors too often, it takes ages. But granny stripe, that was another deal entirely. So I gave it whirl and fell in love with the granny stitch. It turned out pretty great:


I also made my first amigurumi doll. Amigurumi, pronounced ah-mee-goo-roo-mee, is the Japanese practice of crocheting or knitting stuffed animals and the like. For my first project* I made a crochet version of a kokeshi doll doll. It doesn't look too bad for a first time. I even altered the pattern some, which I got from TGLD Doll on Etsy here. I wanted a good pattern to start with and figured I could edit it a little to how I wanted. I have yet to name her so if you have any suggestions please leave a comment!


In other and also exciting news I will be graduating from college in May! Yay! So there will be plenty of apartment posts and DIY posts probably. Not to mention thrifting finds! Lots of exciting things happening! Can't wait to share them all!

*Cards on the table, I tried to make an elephant once before this one but was using the wrong hook and it failed so I'm not counting it. This was my first successful attempt

Sunday, March 4, 2012

Craft Day (part 3)

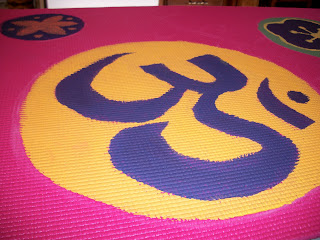
Finally, my project. I went a little bit of a different route. I had been looking around the web for cool yoga mats, and decided I didn't really want to spend the money on a designed one, but still wanted one. So, I decided to paint my own. I first tried to do some research to see if anyone had done this, and a few have, but it took a bit to find any real material besides a few pictures. I did finally find this short tutorial on livestrong. That at least let me know that I could paint my yoga mat and it wouldn't immediately die once I practiced on it. So I used some acrylic paints, a few paint brushes, chalk and, of course, my yoga mat. Here's my attempt at a tutorial:

Step 1: Outline
Use chalk to outline your design. Chalk is great for this because all it takes is a damp washcloth to start with a clean slate again, or to fix some errors.
  
Step 2: Paint! 
There isn't a lot to say about this step. Use acrylic paints and go to town creative style!


 Step 3: Let it dry

Step 4: Do some Yoga
No I don't have a picture of me doing yoga on my new mat, but I should have gotten one.

And that's all there is to it! If you paint your own mat PLEASE send me pictures; I would love to see what you do!

Stay Lovely,
Katelin

Craft Day (part 2)

Megan had a bunch of ideas for what she wanted to do on craft day. She ended up choosing two, a set of burlap place mats and an "I Love You Because" frame. Her inspiration for the place mats came from Cottage and Vine and the board came from A Content Housewife. Take a look at how she did!

Megan's Projects
Burlap Placemats
These weren't the easiest project of the day for sure, mostly because burlap, as it turns out, is a frustrating thing to work with. But they turned out great!


She put some clear craft glue along the edges to prevent the burlap from continuing to fall apart. What's really nice is that you can still see the words when you put a plate on them.

I Love You Frame
Megan got married a bit over a year ago, and she loved the idea of doing this I Love You Because frame for her and her husband to write on now and again. I was apparently working on my project the entire time she made hers, so I didn't get any in-the-process photos. But it's just a matter of a printer, a pretty piece of paper, a frame, and some fabric and glue. The fabric flowers were the most difficult part, for sure. Here's the end result, looks great:

Stay Lovely,
Katelin