Pages

Tuesday, July 31, 2012

Super Cleaning Powers


Yes. That is correct. I have recently developed SUPER cleaning powers. And it's thanks to this amazing thing called baking soda and Ceara from DIYConfessions. I will most likely be eternally grateful to both! 

Story time:I moved into my first apartment ever a few months ago. This wasn't a brand new apartment, so it had of course housed a few other people. Mostly though, it's really clean. But I'm a tad OCD and there was one area that was not clean enough for me: The Kitchen Sink. 

Yes, it was a little grimy and filled with black scratch marks and waters stains all over. It was driving me nutty.. I didn't get a before picture, sadly, but I'm sure you can imagine, especially if you've ever rented an apartment or house. 

I went on a hunt for a cleaning solution, and I found a recipe from DIYConfessions for a natural water stain remover. Now, I didn't have a great big spray bottle to mix the ingredients in like she did, so I justput in varying amounts of the three ingredients in a little dollar spray bottle: 
  1. White Vinegar
  2. Lemon Juice
  3. Dish Soap
This mix works pretty well alone, but if you want to see some real magic (which, who doesn't want to see cleaning related magic?) Follow these steps:
  1. Mix spray
  2. Sprinkle baking soda over trouble zones
  3. Spray with the stain remover mix
  4. Let bubble up in cleaning goodness
  5. Scrub away the grime!
And you're done! For less troubling areas that just need a little bit of TLC, you can just let the baking soda sprayed with the mix sit for a few minutes and then rinse away.

Enjoy your new super cleaning powers! You'll feel the need to wear a cape while cleaning now, trust me.

Wednesday, July 4, 2012

Magic Mud Body Scrub


I've never really used body scrub and to be honest I always thought it sounded like a waste of time and money, but I was bored the other day and thought I'd try to make one. I'd read how coffee body scrubs are extra great because the caffeine helps with skin elasticity and cellulite and such (supposedly) so I figured I'd start there.

After trying my concoction I dubbed it Magic Mud because it was SO amazing. I have some dry skin issues but after using this just once it was a drastic change, all smooth and soft! It certainly converted me into a body scrub believer. So here's the recipe, I strongly encourage you to try it out! It is really easy to switch up too so mix however you feel works best!
4 T used coffee (you can use dry coffee, but why waste good coffee?)
1/2 c white or brown sugar
1 T olive oil
1.5 T water (optional - less water will equal a courser scrub)
Lavender (you can also use essential oils, other herbs or any spices)

Mix the coffee and sugar. Mix in the olive oil and water. Cut up the lavender and mix in.

For use, it's recommended to soak or stand in a hot shower before applying, rub on in circles, rinse, and embrace your new soft skin! Store in a jar and use once a month or as often as you like. And enjoy! It will settle after sitting for a bit, so stir before each use.

Stay Lovely,
Katelin


Monday, May 28, 2012

Homemade Graham Crackers Recipe

As you may know from reading my bread-making post, I am trying to make more homemade stuff. I have a growing list of things I want to make, but most recently I tackled graham crackers. I looked through two recipes and used a bit from both. From Smitten Kitchen I took the topping for the graham crackers and from Chocolate & Carrots I took most of the recipe. I did use regular flour and sugar though. I figure I will just rewrite the recipe as I did it. So please consider it an adaptation from the two blogs.

Homemade Graham Crackers 
Ingredients
Crackers
2 1/2 cup flour
1/2 teaspoon baking soda
1/2 teaspoon ground cinnamon
1 cup (2 sticks) unsalted butter, mostly melted
1/4 cup packed dark brown sugar
1/4 cup sugar
1/4 cup honey
 Topping
3 tablespoons sugar
1 teaspoon ground cinnamon
Make the Dough
In a bowl stir the flour, baking soda, and cinnamon together. Set aside.
In another bowl mix the remaining ingredients together. Your butter should be mostly melted, but not fully. You can hand mix or use a mixer to beat the ingredients until combined.*
Add in the flour mixture in two shifts, mixing until well combined.

Chill the Dough
Try to make your dough look rectangular, wrap it in plastic wrap and put it in the fridge to harden. (the rectangle isn't that important, it just may help with cutting the dough later)
Wait 30 minutes or longer, until dough is chilled and firm.

Cut Out the Crackers
Preheat the oven to 350°F.
Roll out the dough on a floured surface until it’s 1/8 thick. The dough will be sticky so use more flour as necessary and roll out the dough slowly to prevent tearing.
Cut the dough out into  squares of whatever size your prefer with whichever tool you prefer (I used a pizza cutter).

Bake the Crackers 
Preheat the oven to 350°F.
Place the crackers, about 1 inch apart, on a baking sheet covered with parchment paper.
Score the squares down the middle and poke some holes in the top with a fork, or decorate however you prefer.
Sprinkle the topping over the crackers.
Place the baking sheet in the freezer for 5-10 minutes to harden the cookies a little before baking.
Bake for 15-20 minutes, rotating the pan halfway through.
Allow to cool before removing from the baking sheet(s).


Enjoy!
S'mores, cheesecake, an afternoon snack...whatever you want to use these crackers for go for it! They are certifiably delicious! Though don't expect them to taste like store-bought ones (aka junk). These are a little more like cinnamon shortbread cookies. They'd be great with tea and maybe jam!

If you do make these let me know how they turn out and what you have with them!
Stay Lovely,
Katelin 

Sunday, May 13, 2012

Bread Making - An Attempt and Partial Success

I'm so tired of all the extra, unnecessary ingredients in store-bought food. A simple loaf of bread has a magnitude of "fake" ingredients including such bizarre things asazodicarbonamide (found, in the UK, to be a respiratory sensitizer and can increase the risk of allergic reactions to other ingredients in the food such as dyes) , calcium propionate (a preservative, which is slightly toxic and, strangely, can be and is used to give rats a model of human autism), and, of course, high fructose corn syrup. It's too much. And bread isn't even the tip of the iceberg when it comes to random crap in our food, but it is a good starting point. 

For years I've been planning to start making my own food and/or buying fresh made local food. Putting for the effort it takes is so worth the reward I think. Now that I've moved into my apartment I can finally get started on my plan! And so I have. First stop: bread.
Recipe and tools all ready to go
I used this recipe from Get Up Off Your Butt And Bake (a fantastic blog you should all check out). I got all ready and set off for my first attempt at bread, hoping for the best and wearing my cutest apron for confidence.
 
It took no time at all to start twirling my little kitchen into an absolute mess. And it was only going to get worse.
Check out that yeast! Look at it rise! That started at about 2/3 cups! Beautiful!
I just got my dough hooks in the mail Friday. But as soon as I started mixing I feared my little hand mixer wasn't up to the task of this recipe. My bowl was a little small for recipe as well. The recipe, halved, makes two loaves of bread and 20 scones (or three loaves of bread but I wanted to try out the scones - bad choice as you will see later). Well, the dough didn't cooperate with my mixer, that's for sure. At one point my little dough hook fell out, unable to support the weight of the dough climbing up on it. The dough also took victim my spatula, pulling the spatula off of the handle.
Finally I just sighed, put down the mixer, and went to work the good old-fashioned way: kneading by hand. I would have done that anyway but was worried I would over-knead it.

I didn't have a bowl big enough to let the dough rise in, so I went ahead an pulled out my great big sauce pan. It worked pretty darn well too!
Look at that! Beautiful!


I tried to shape mine nicely like she does on her site, but it didn't go so well. I may have also abused the left one too much trying to get it to look "right."
One of my loaves rose faster than the other, so I baked them separate. The one that didn't raise at the right speed was the one I fear I handled too much trying to shape it. During this I attempted scones...I won't go into the details but they died a painful death. Afterwards my mom (happy mothers day mom!) informed me I should have never attempted to cook them in oil like she said to. Lesson learned.

My first loaf looked great, despite a piece of crust falling off when I turned it onto the rack. My second loaf...struggled. It sort of deflated in the oven. Not sure why. If you happen to know, please share!
Though my bread doesn't quite look perfect, it tastes great! Thankfully! And I hear it only get's easier. It will be easier too once I understand my oven a little better. I think it may bake a little quicker than most recipes call for, but haven't made enough to yet be sure.
So I have my first bread! I'm looking forward to taking a peanut butter and jelly sandwich to work tomorrow with my fresh bread, homemade jam from the farmers market, and peanut butter (still not homemade but I'm taking small steps).

Stay Lovely,
Katelin

Friday, May 11, 2012

Comfy, Practical, and Fashionable - Toms Shoes

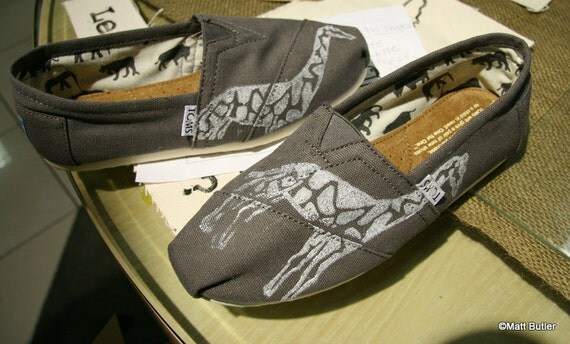
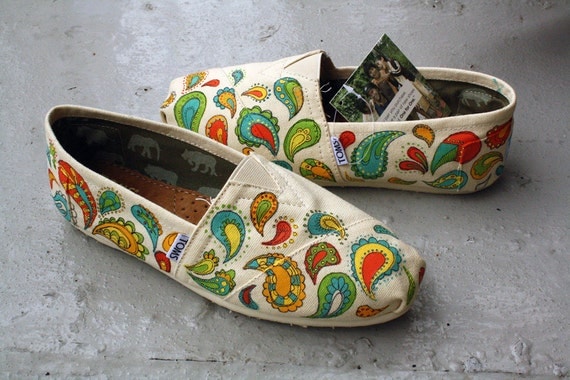
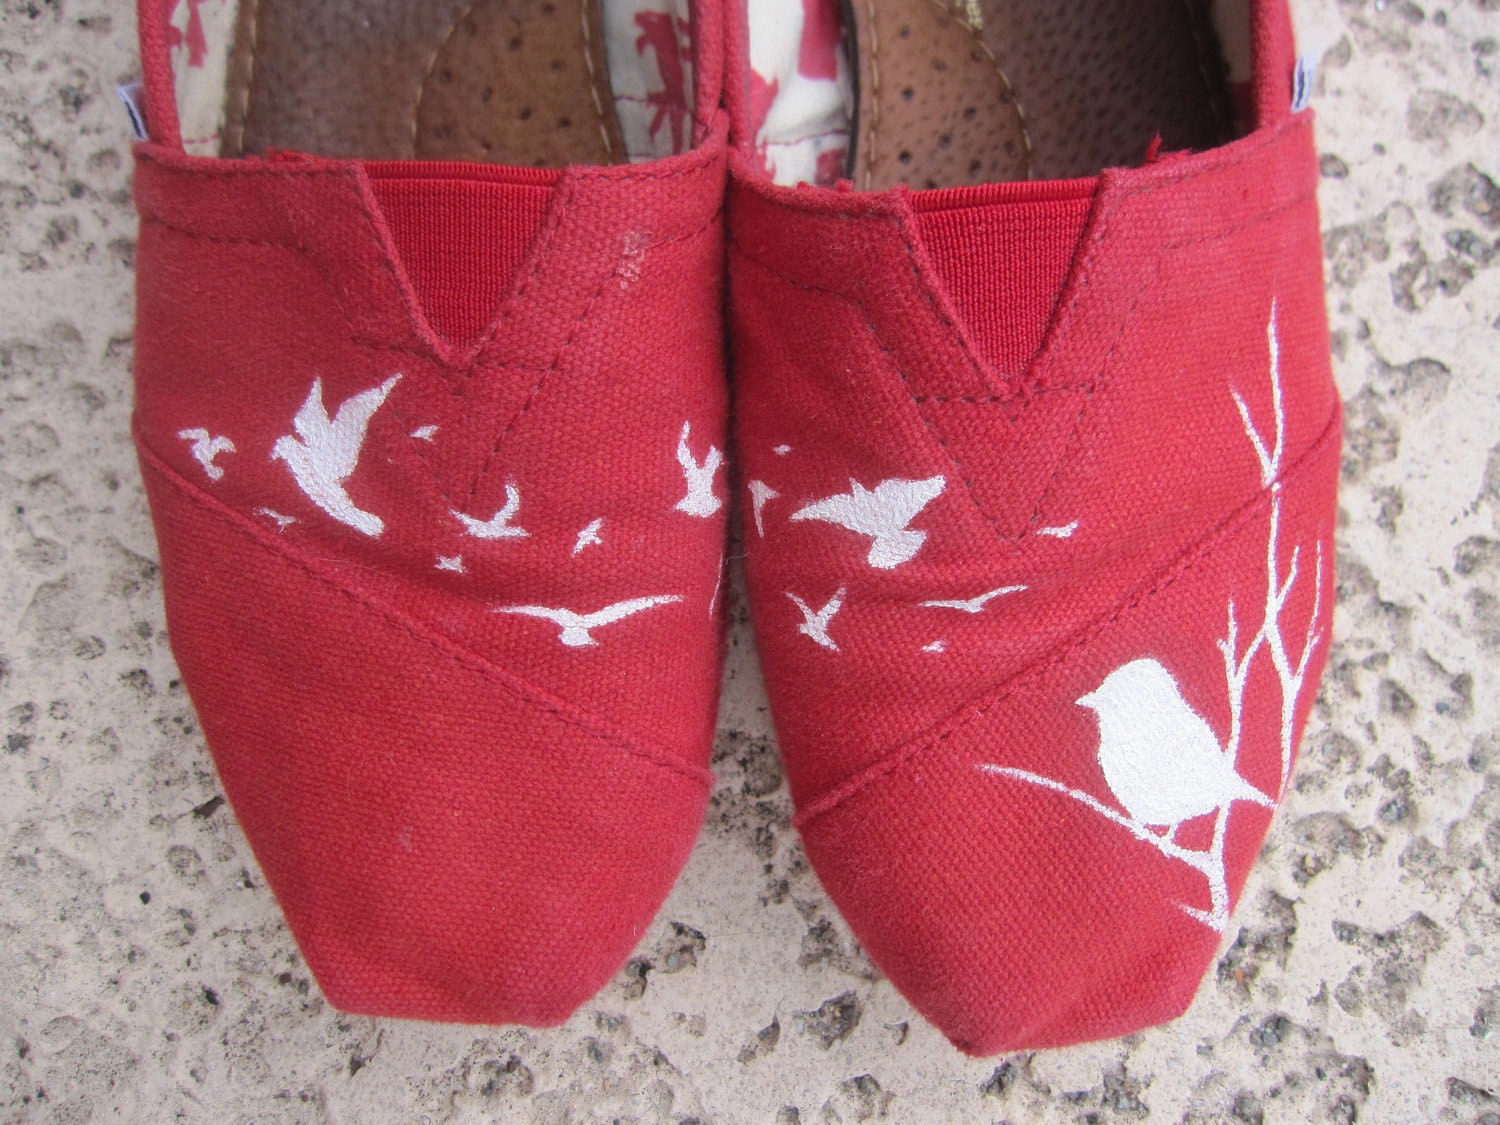
I have one pair of Toms. I need more. I asked for a pair for Christmas because I just liked the way they look and heard they were extremely comfortable.* And they are, indeed, extremely comfortable. People have started customizing Toms with brilliant artwork. Some are really fantastic, but usually pretty pricey. I may try to do my own eventually, but not until I get a second pair. Here are some envy-worthy options from Etsy:

Giraffe TOMS shoes
Giraffe Toms (in case you didn't know I love giraffes) - $73


Custom TOMS - Big Paisley
Paisley Toms - $82
Handpainted Flying Birds TOMS
Flying Birds Toms - $90
Custom Galaxy Toms
Galaxy Toms - $100

 
And there are so many more where these came from! Including some fantastic Hunger Games options!  
 
*While it is true that Toms do one-to-one (giving one pair of shoes to someone who needs it for each pair bought). However there are several problems with that equation that Toms keeps buried, but in summation the one-to-one, in my opinion, is mostly a publicity stunt for a for-profit business. I just wanted to clarify that I wanted a pair because of the style.

Monday, May 7, 2012

My First Meal: Chicken Stir-Fry and Crescent Rolls

It's a day of firsts for me. I worked for the first day of my full-time job, and came home to make my first real meal tonight in my first apartment! Now that I have a kitchen (after three years in the dorms) I intend to make delicious REAL meals all the time. Yes, real! As in not questionable like the fare at the dorm dining center always was.

So what did I pick for my first meal attempt? A yummy looking chicken stir-fry and crescent rolls from scratch! Both recipes I used came from the fantastic food blog Get Off Your Butt and Bake.

Crescent Rolls
That's right, homemade crescent rolls for my first real meal! With yeast, rising and everything! It was actually a lot easier to make than I thought. Though I will say I thought they tasted at least a little bland, but I think that may have had something to do with lack of extreme amounts of butter. I didn't have anything to brush butter on my dough and finished rolls with, so those few steps were a little difficult. But still, hard to go wrong with fresh from the oven rolls.


Stir-Fry
This was the first time I had ever cut chicken, and let me tell you it is not a piece of cake. Plus I was extra worried about that whole cleaning up properly because of salmonella. I also cut up carrots and the frozen broccoli I got. I even managed to steam both the carrots and broccoli together instead of attempting to do them separate AND they weren't even remotely over-cooked!


I will admit, making this meal took what seemed like an awfully long time. But I'm sure things will speed up the more I cook. Regardless I had a lovely meal and even had lovely company as my friend Alyssa stopped in to see my new place and shared this lovely dinner with me! 


You should absolutely check out Get Off Your Butt and Bake for fantastic and simple recipes! I'm certain I will be making many more, including loafs of bread and a beef stir fry!

Stay Lovely,
Katelin

Saturday, May 5, 2012

My New Home (Sneak Peak!)

Hello m'dears! As of this past Monday I began moving into my first apartment! Awfully exciting, I know. I have been storing up ideas for this moment in my life for YEARS now, both in magazine cutouts with my "idea book" and the new and epic Pinterest (my 'ideas for my space board' for example) which has made it so much easier, as I used to just have to store pictures and links on my computer.

So anyway...I was excited! I mean tripping over myself with anticipation excited. And now I am here! It's not finished up yet, or really read to share as I still have piles of shoes and clothes on the ground, boxes to be emptied, and things to organize. BUT I wanted to share a few little sneak peaks at my new digs for your viewing pleasure. Take a gander! And if you want some even bigger peaks into my place, follow Hello Lovely on Facebook; I will be putting up a few extras there like my fantastic couch! But otherwise enjoy the preview:


Stay Lovely,
Katelin

Monday, April 23, 2012

Thrifting in Cedar Rapids (Iowa)

So I shared some of my thrifting adventures before, also in Cedar Rapids, but here are some more.

I went to Cedar Rapids this past weekend for to visit a friend, and before I went I looked up a few shops I wanted to see and even mapped out my route. Let me tell you I was excited. Cedar Falls, where I live, has a few shops like Antiques on Main but I haven't been able to find stuff around here like I can in Cedar Rapids.

I had three stops on my agenda:
1. Treasure Chest Collectibles - They were having a "grand opening" to celebrate new ownership
3203 1st Ave SE Cedar Rapids, IA 52402
 2. The Cellar Door & Stable on the Alley
2900 1st Ave NE Cedar Rapids, IA 52402
3. 1st Class Finds - I had gone here before, as mentioned in my last thrifting post
227 14th Ave SE, Cedar Rapids, IA 52401
So I set off on my journey with high hopes and a little cash. I wasn't disappointed.


Treasure Chest Collectibles
The owners here are a little annoying, bordering on a lot annoying. I am not sure if they were just over-excited because they just came into ownership and were celebrating or if they are just naturally pushy, but I didn't appreciate that. The shop itself is great for nicknacks and collectibles, and there is some furniture but not a ton. It was mostly benches tables and dressers. I did manage to find a $5 rolling pin that I was pretty excited about. Here are a few pictures of some other things I found:


I did snatch up this adorable hand painted vase (supposedly Japanese but all I can read on the bottom is hand painted):

The Cellar Door & Stable on the Alley
This place had awesome reviews online, despite looking a little shady. So I thought I may as well go for it. It is actually two shops that are connected. The owner of The Cellar Door (approximately 8 rooms in all) is a riot. He's very friendly and funny and wants to talk. He had a few good things, and quite a range from absolute crap to valuable items to things that looked brand new and modern. I thought some things were a little overpriced, but overall it was decent. I will say it was a little more flea-market-esque than most of the places I've been, but not overly so. A few finds below:


Attached, as I said, is what I assume is The Stable on The Alley. Just one room in the back, I liked this more than the several rooms of the cellar door. A woman worked this, and she was very laid back and nice. The stuff in this area was mostly nicer and better quality. I may be slightly biased though as I found the absolute best chair there for just 30 bucks.


She made great use of space too, you have to make sure to look up at the ceiling if you go here because she stores stuff up there that you can also buy, like some really great looking vintage suitcases. But the most exciting part about this side is that I found this fantastic chair for just $30:


1st Class Finds and The Copper Alligator
So I've talked about 1st class finds before, but when I went this time it was so different. It looked rather empty actually. It's a pretty big space, and a room that has previously contained mostly clothes and accessories had been emptied and filled with records and more furniture. I naturally inquired about this as the clothes were one of the most interesting parts there, and he told me that he had rented that room out to a couple of girls and they moved down into the Czech Village and the store was called the Copper Alligator. 1st Class Finds is pretty good for furniture, but stuff is snatched up quickly and it's not the best I've seen, but the Copper Alligator is wonderful for clothes, accessories, decor, and some furniture too. I love the small child shoes you can see below on the right; I wish I had someone to give them to who would have their little girl wear them. And sadly the other shoes shown were just about one size too small, that was a bummer. This store is definitely worth a stop.


Hope this helps with your next thrifting adventures as well! 
Stay Lovely,
Katelin

Monday, April 16, 2012

I'm Back! Crochet Blanket, Amigurumi and more

Hello All! I had to put a pause on Hello Lovely for a little while and focus on another blog I have (The Gallery) for a class of mine. I've been busy though!

I finished my first granny stripe afghan! This will be the second blanket I have crocheted, the first being a Christmas present for my mom (below). That was a monster. Nothing compared to the one I made for myself, it was made with Lion Brand's Wool Ease which makes it rather heavy. It's perfect for those chilly winter nights in Iowa, that's for sure.

After snuggling in that one I knew I had to make one for myself. I had started a granny square blanket a while back, but that just wasn't for me. You change colors too often, it takes ages. But granny stripe, that was another deal entirely. So I gave it whirl and fell in love with the granny stitch. It turned out pretty great:


I also made my first amigurumi doll. Amigurumi, pronounced ah-mee-goo-roo-mee, is the Japanese practice of crocheting or knitting stuffed animals and the like. For my first project* I made a crochet version of a kokeshi doll doll. It doesn't look too bad for a first time. I even altered the pattern some, which I got from TGLD Doll on Etsy here. I wanted a good pattern to start with and figured I could edit it a little to how I wanted. I have yet to name her so if you have any suggestions please leave a comment!


In other and also exciting news I will be graduating from college in May! Yay! So there will be plenty of apartment posts and DIY posts probably. Not to mention thrifting finds! Lots of exciting things happening! Can't wait to share them all!

*Cards on the table, I tried to make an elephant once before this one but was using the wrong hook and it failed so I'm not counting it. This was my first successful attempt

Monday, March 12, 2012

Surprised in Ames

I don't go over to Ames (Iowa) very often. And I rarely go out and about when I am there. I went this past weekend however and was surprised by the little things of art I came across. I went to Wheatsfield, a health store, and found a lot of great product design. If you are in love with graphic design as well as being crafty then check out my other blog, The Gallery, to see the great packaging I found.

In addition to great packaging, I came across this handmade cards by Lonna.


I only got a chance to get a picture of two of the cards, but you can look through the options and buy your own Lonna's Cards her site here.

One more surprise I came across in the store was an art vending machine. You read right. It was a vending machine where you could get little pieces of handmade art. It was so cool.


It had jewelry, a little bowl (which didn't seem like the best idea to me considering it could break when you let it fall), little drawings, bookmarks, bags, buttons. Just a ton of stuff. It was very cool, unique, and definitely a surprise.


Monday, March 5, 2012

Adventures in Thrifting

One of my New Year's goals* was to work on thrifting. I know people in real life and on the blogisphere that are awesome at it and had the most fantastic and unique things, from clothing to furniture, because they were great at thrift shopping. I love the idea of having unique stuff AND it is (usually) cheaper.

So I've dabbled here and there, not finding much worth sharing honestly. But this weekend I went to visit a friend in Cedar Rapids (Iowa) and we went to a store I had found online called 1st Class Finds and wanted to check out. It is by far the absolute best second-hand/thrift/vintage store I have found yet. The owner had everything it seemed like! Really great stuff. I wanted like fifty different things, but tried to stay financially concious and just bought one item. One amazing item!

This Italian made, unique, triangular table that doubles as a music box when opened for just $25 (hopefully I'll add more pictures later or on the Hello Lovely Facebook page)

Some other great finds at 1st Class Finds (sorry for no prices**):
Vintage radio. Would look great on a bookshelf or table!

Traveling bar briefcase!

Couldn't decide if this was a blanket or a rug but it was gorgeous
 
My friend and I also went to another thrift shop in the Czech Village that had some interesting stuff but was a tad overpriced. These awesome blocks were $3 per block.

But they also had some fantastic military wear that is worth keeping an eye on. Including jackets from Vietnam for just $10 and tons of authentic patches and medals.

*I don't make resolutions but call them goals. "Resolution" makes me feel like a failed if I don't do it, since it means I resolved to do something.
**I'll try do do better at pictures and pricing next time I go on a thrift adventure.